Chicago Bears Desk
As you all should know by now I am a HUGE Chicago Bears Fan!
My office/craft room is dedicated to Da Bears so what better thing to have in my office than a Chicago Bears Desk!?!? I have been working on this desk for months and months! I know it shouldn't have taken me as long as it has but I've been working on it here and there and not constantly.
I started with a table that was meant to be a dining room table. I primed it and used a foam roller because every blog or pinterest thing I read said use a foam roller. I don't recommend a foam roller though. It caused the paint to be textured and I don't like that. I have used a foam roller on several projects and honestly hate it, so from now on regular rollers for me! Leaves a MUCH smoother finish, for my desk though it's not necessary to have a smooth finish because I'm going to add a glass top to it!
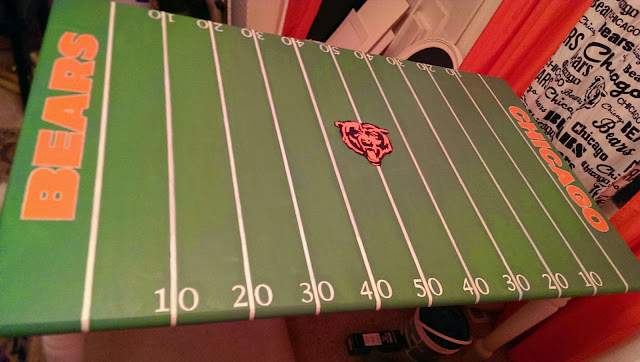
Anyways, after priming my table I painted the top green, like grass green and the table legs and sides I painted white. I then measured the table (5ftx3ft) to decide how I wanted to divide up the table into "yard lines" I knew I needed two endzones and 9 different "yard lines." My endzones are 5in and the rest of the yard lines are also 5in apart. I then took a ruler and a paint pen and drew the "yard lines" and with a stencil I added the 10s, 20s, 30s, 40s, and 50. At this point I stopped working on my table for awhile (months) because I needed (wanted) an easy way to add "Bears" "Chicago" and a bear head to the table. Lucky for me a friend just recently bought a vinyl printer! Like seriously lucky me! Because of this printer my job just got 100% easier! I had originally planned on tracing the letters onto the table and hand painting the lettering and bear head, which would have taken forever and would not have been even close to what it turned out to look like. So my friend let me use their printer and we printed out "Bears" "Chicago" and two versions of the bear head. I used the Chicago Bears original font (just like their field) because I wanted it authentic. Although unlike their field I put a bear head in the center of the field instead of the Bears C.


I put down the stencil and then painted it all one coat of green, I did this in case of any bleeding of the paint.

After the green dried I did two coats of primer so the orange would be easier to paint. After the primer dried I did 4 coats of orange. Four seems excessive but I wanted to make sure it was perfect.

Now I've read to pull off stencils before paint is done drying so I did that. DO NOT BELIVE EVERYTHING YOU READ! because once again I was led astray (first time was foam rollers, ugh) the paint came with it, so I had to do some touch-ups.

It still looks good but I wish I had let the paint dry, lesson was learned though and I waited when it came time to do the bear head. Since the bear head needed to be both orange and blue I had to add stencil on top of my other stencil. Once the orange dried on the bear head I put down the new stencil and did one coat orange, in case of bleeding. I then did 3 coats of the blue. I waited until the paint was all dry and then took an exacto knife to the stencil. This part was tedious, some paint came up with the stencil so I had to go slow and had to be super careful. It looks good though so it was worth the patience. I then decided to add a white outline around the "Bears" and "Chicago" since that is how the field is in real-life. I just used a paint pen again, I then took green paint and touched up any spots that needed it. I personally think it looks pretty awesome now and I'm very excited to start using my craft room more!!
After the green dried I did two coats of primer so the orange would be easier to paint. After the primer dried I did 4 coats of orange. Four seems excessive but I wanted to make sure it was perfect.
Now I've read to pull off stencils before paint is done drying so I did that. DO NOT BELIVE EVERYTHING YOU READ! because once again I was led astray (first time was foam rollers, ugh) the paint came with it, so I had to do some touch-ups.
It still looks good but I wish I had let the paint dry, lesson was learned though and I waited when it came time to do the bear head. Since the bear head needed to be both orange and blue I had to add stencil on top of my other stencil. Once the orange dried on the bear head I put down the new stencil and did one coat orange, in case of bleeding. I then did 3 coats of the blue. I waited until the paint was all dry and then took an exacto knife to the stencil. This part was tedious, some paint came up with the stencil so I had to go slow and had to be super careful. It looks good though so it was worth the patience. I then decided to add a white outline around the "Bears" and "Chicago" since that is how the field is in real-life. I just used a paint pen again, I then took green paint and touched up any spots that needed it. I personally think it looks pretty awesome now and I'm very excited to start using my craft room more!!
All in all this project probably only took me like a days time, the table cost me $85 and maybe $30 worth of supplies and most of that was paint. Below are pictures of the whole process! I'm looking forward to more projects like this for my office/craft room!!